Tuesday, March 8, 2022

Gondola loads

 Here are some easy ways to load up your gondolas.

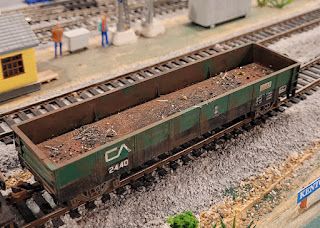
1. Dirty up the empties - Empty model gons have two problems: they are too light, and too clean. We can add some weight by placing a flat steel weight salvaged from a boxcar right on the bottom. The weight from a 40' box car fits nicely in a 40' gon, as seen below. Next, we will dirty it up so it is not so obvious what we have done. Gons always have some debris in the bottom. Gather some workbench and floor sweepings, sift them through a colander or screen to eliminate the big chunks. Paint the bottom of the gon (or the steel weight, in this case) with thinned white glue and sprinkle a bit of detritus around. A little goes a long way!


click to enlarge

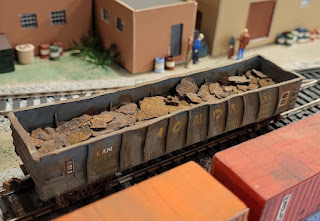
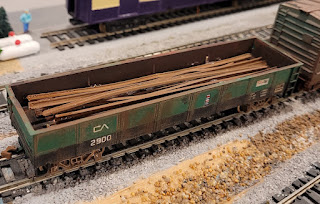
2. A real scrap iron load: I noticed from rust flaking off the inside of the rear bumper on my truck. I gathered the pieces and broke them up smaller with a hammer. Loaded them in the gondola and dripped some thinned white glue over them to secure them.


click to enlarge

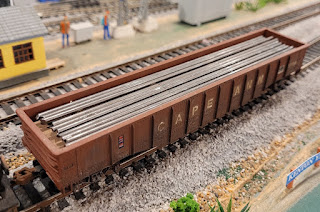
3. Pipes or rebar:  I saw a local freight go by with a load of rebar recently, so I wanted to create something similar. I had a box of insulation support wires which I cut up to make a load. You can paint them yellow or green to simulated epoxy-coated rebar. These support wires some with a anti-rust oily coating so they need to be washed in soapy water before painting. These get heavy real quick, so I just put one layer on top of some stripwood spacers. 


click to enlarge


4. Rails being scrapped: This one was fun. Jointed rail used to come in 39' lengths to fit in 40' gondolas. I had some nasty old brass track from my first layout, and used it to make a load of old rail being scrapped. Just strip off the ties, and paint the rails brown. Don't worry about keeping them straight! Just pile them in with a few blobs of clear RTV silicone sealant here and there to keep them in place.


click to enlarge

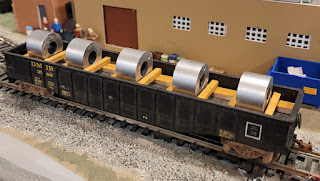
5. Sheet metal coils: This is a little more involved. These are rolls of new sheet metal being delivered. The rolls are plastic spacers which came with a TV wall mount kit (you can also get them separately). Spray paint them aluminum color, and mount in cradles made of stripwood.


click to enlarge


Saturday, February 12, 2022

Replacement brake wheels

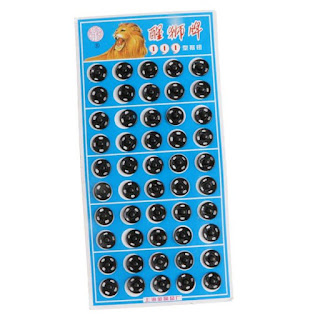
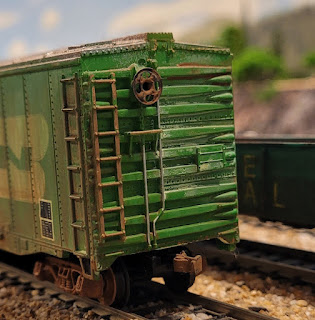
 Here is an economical replacement for missing brake wheels: 8mm metal dress snaps.


These are found in the sewing department of many stores such as Walmart or Amazon.  I found a card of 24 for $6.99 on Amazon. They come in 4mm, 6mm, 8mm, and 10mm. I use 8mm for HO scale.

The measurement specification is for the (unused) larger, female half.  Buying the 8mm size will provide a 8mm female (unused) and a 6mm male (which is about the right size).


Just separate the two halves of the snap. Discard the female half. Enlarge the hole  in the freight car if necessary. Put a drop of Krazy Glue in the hole, then press the male half of the snap into the hole.


Monday, January 10, 2022

Easy window air conditioners

 Need some easy HO scale window air conditioners? Cut the head off a zip tie, paint it white, filling the opening with paint. When it dries, add some silver paint to the hole area to simulate the finned condenser. Stick it on your window and you’re ready for summer!


Wednesday, November 11, 2020

Mini Wheel Pasta Fans

American Chop Suey was the original plan. But the grocery store was out of elbow macaroni, so I looked for something close to substitute, and chose these little mini-wheel pastas. They looked like they might have some model railroad potential as gears or big HVAC fan units. Two mini-wheels were spray painted silver. An 8-nub Lego block was turned upside-down, with a piece of styrene to cover the open Lego bottom (now the top). The Lego block was spray painted HVAC green. The mini-wheels were glued on top. Placed on top of a building, the Lego nubs space the HVAC unit up off the roof a bit. Another bit of styrene on the side suggests an electrical disconnect box.


Mini Wheel pasta


All the ingredients.


Finished HVAC unit.


Wednesday, July 29, 2020

Scouring Pad Hedges

These rectangular scouring pads make nice hedges to go alongside your structures. Measure, cut, glue in place. Makes the structures look like they belong there, instead of just being plopped in place.


Wednesday, July 8, 2020

Architectural Vehicles


Architectural vehicles on an HO layout


Here is how to populate your layout with lots of vehicles for a fraction of the cost of "real" HO vehicles. On eBay, look for "Architectural Vehicles". This search should get you there. The secret: these were never intended for model railroads at all. They are intended for architectural models, where architects have to fill up parking lots and street scenes with lots of generic vehicles to show clients.

The two primary architectural scales are 1:100 (good for HO) and 1:200 (good for N).

Take the scale designations with a big grain of salt. Here is an alleged 1:100 vehicle. I put my scale ruler on it, which says it is 14 feet long in HO. Then I went outside and measured my actual Kia Optima, a mid-size vehicle: 14 feet 8 inches.

14 feet long


These are NOT highly detailed models. They consist of three pieces: a black chassis/wheelset (wheels are molded in place, and do not turn), a clear window insert, and a body. You can snap them apart easily if you wish to paint the body a different color. You can improve their looks by painting the headlights and taillights, and a license plate.


three pieces


homemade taxis


All train stations need taxis. I made some by painting some cars yellow, adding a bit of styrene to the roof for a TAXI sign, and then adding a black stripe with a mini brush.

Cheap, but slow 

typical eBay listing

The bigger the lot, the cheaper they are! Look for the 25 or 50 packs. You can probably get 50 vehicles for less than $20. These are mailed direct from China. It takes about 3 weeks to arrive in the USA.

Sunday, March 29, 2020

Simple Car Cards & Waybills


Here is a simple, inexpensive car card and waybill system for freight car routing; which minimizes handling and makes routing obvious for old forgetful operators like me, and for new operators on your layout.

Materials:

  • Baseball card toploader sleeves. Toploader means the opening is on the shorter side. (Amazon) 
  • Car cards, cardstock cut to baseball card size (3 1/2” x 2 5/8”)
  • Waybills (cut from 3x5 index cards)
  • Channel: vinyl outside-corner molding used for bathroom tile, UPC 70673 85883 (Home Depot)
  • Elastic hair bands 

Preparation

Create a list of standard abbreviations to include all possible freight car destinations on your layout. Use the same abbreviations consistently. I use three-letter abbreviations. Here is the list of abbreviations on my layout.

BOL Bolton Railcar Maintenance Facility
COM Commissary
CPR Chronicle Printing, Marias
CSH Cascade Section House
DAS Davis Passenger Station
DAV Davis Classification Yard
EEE EEE Feed and Supply, Marias
FRT Freight House and Team Track
GCF Glen Cove Fuels, Glen Cove
GCM Glen Cove Signal Maintenance Yard
KEL Kenton Electric Fabricators, Kenton
KEN Kenton Yard
KFF Kenton Freight Forwarders
LMS Leslie Marine Services, Marias
MMT Marias Machining & Tool, Marias
NPO North Portal Interchange
PAM Pamola siding
PSH Pamola Section House
PTC Precision Tooling Corporation, Marias
QUI Quinn Intermodal Yard
SPO South Portal Interchange


Install a channel all along the edge of the layout to hold the sleeves. It is helpful to label the destinations on the channel itself. The channel comes in 8 foot lengths, so it easy to just mount channel everywhere all along the edge of your layout. The channel has a flange which allows you to tack it in place from below, so no nails will be visible. Or you can just run a bead of adhesive on it and glue it in place.

channel material: vinyl outside-corner tile molding

car card/waybill rests in channel


Each freight car gets a Car Card. These are cut to baseball card size and show the reporting marks, car type, and destination for the car when empty. The Car Card is inserted into a baseball card sleeve,

car card in sleeve


Each sleeve/Car Card will always stay with its associated car.

When on the layout, the sleeve rests in the channel in front of the car.

When in transit, like the prototype, the waybills go along for the ride. A recycled margarine tub next to the power pack works well.


When off the layout, keep car and sleeve together by using an elastic hair band. These are soft and won’t mar your cars, and they won't dry out like rubber bands.


Waybills

Waybills are half-size cards which have a destination written on both front and back. The destination abbreviation is written in big red letters for easy viewing, so you need not pick up a card to read the destination. The waybill is inserted in the lower half of the sleeve so it is visible in front of the Car Card. With only two destinations written on the waybill, it is a 2-cycle waybill. You can also write the load information on the waybill if you wish.

waybill inserted


Operation

There is no car “storage” on my layout. Every car on the rails is in the process of going somewhere else. (The cars go in/out interchange tracks to/from a rolling storage rack, which represents all destinations beyond the layout). The abbreviation shows where the car is going NEXT. When setting out a car at a destination, the operator places the sleeve in the channel where it will remain.

car at destination


At the end of a session, all the cars are hopefully at their destination for the day.  After a certain time has elapsed (typically, in between sessions), it is time to advance the waybills to prepare the cars for their next move. In each sleeve, turn the waybill over so the next location is showing. Now replace the sleeve in the channel, but place it standing UP to indicate the car is ready to be picked UP.

car ready for pickUP


To indicate an empty, just place the waybill BEHIND the car card so it cannot be seen, which reveals the empty routing instructions written on the lower half of the car card.

no waybill indicates empty car


Now when the train comes by, it is obvious to the operator which cars have recently been set out (the sleeves are horizontal, and waybill abbreviation matches the car’s current location); and which are ready to be picked UP (the sleeve is standing UP, and the waybill abbreviation shows a new destination).

This makes it easy to check that you delivered all your cars during the session. If you see any sleeves still standing UP, you still have work to do!

Making up trains

A length of channel can be mounted on the top of the layout in front of a sorting track, so the yard operator can clearly see which car is going where, and rearrange/block them in an efficient order as a train is made up. I just set the cards in correct order first, then shuffle the cars until they line up with the cards.

making up a train


Multiple tracks

Multiple channels can be mounted in front of multiple tracks, so the sleeves are arranged in the same pattern as the cars.
How complete is your railroad?

HOW COMPLETE IS YOUR RAILROAD?
by Rick Mills

It is said that a model railroad is never finished, and sometimes we get discouraged at a perceived lack of progress. Measuring progress can be very elusive and subjective. 

Here is a little tool to estimate the level of completion of your railroad. 

There are ten categories. Rate each category from 0 (nothing done) to 10 (complete). Then add up the scores to find the percentage of completion for the entire railroad. 

Category Possible My score
Backdrop 10
Lighting 10
Benchwork 10
Trackwork 10
Track wiring & control 10
Scenery 10
Locomotives 10
Rolling stock 10
Structures 10
Small details (figures, signs, etc). 10
Total 100

This gives you a very rough estimate - since no attempt is made to weight the amount of effort required to complete each category. However, it can be used as a personal tracking and goal-setting tool. Say you are at 60% and wish to complete it in four years. You can strive to increase your completion by 10% per year by chipping away at the various categories that number less than 10. Perhaps make a New Year's resolution to take a "measurement" every January 1!


Friday, March 20, 2020

Cemetery

What to do with that little piece of leftover layout? A cemetery can fit any size space. Adjacent to a church is a logical place. Gravestones are bits of styrene painted various shades of grey (good use for bread bag closure tabs). Crosses can be cut from white plastic canvas material (I use 7 mesh, which is 7 squares per inch).


Thursday, March 19, 2020

Weed Sprayer


Here is an easy-to-make weed sprayer for your M.o.W. crew.


  • Materials needed:
  • Life-Like track cleaner car
  • Matchbox Rainmaker irrigation tractor
  • Two small brad nails
  • Decals: Microscale 87-1012
  • White (Elmer's) Glue
  • BB shot


Obtain a Life-Like track cleaner car. These are readily available on eBay (try this search) or swap meets. Remove the cleaning pad from the bottom, and the sidewalls on either side of the tank. Put a squirt of white glue into the tank, and add BB shot to get the weight up to spec (4 oz.) Then another squirt of glue, and tip the car back and forth so all the BB shot is glued in place and won't roll around. Paint as desired. Remove the caboose section temporarily to add window glazing if desired. 


Obtain a Matchbox Rainmaker irrigation tractor (try this search). Remove the two spray arms.


Drill two small holes through the deck of the car for the hinge pins, which are two small brad nails inserted up through the bottom and glued in place. Add a short piece of wire in the first stake pocket to act as a retainer to hold the spray arms closed which car is in transit. Slide the spray arms into place, and that is all!

"Weed Spray" decal can be found in Microscale set 87-1012.

Push the weed spray car along your track tank-end first, so the operator (in the cupola) can see to operate the spray arms, and retract them from obstructions.

spray arms in closed position


Tuesday, February 18, 2020

Blue Flag Protection for your layout


If you use panel switches to control blocks of track, this is a familiar problem. You come to the train room, turn on your power pack, and - surprise! A locomotive starts off down the layout unexpectedly, because you left a block switch engaged last time around. This can be a big hazard, as the locomotive can head off for big trouble before you can react to stop it.

Here is my solution: a modified form of “blue flag protection”. It consists of a vitamin pill bottle, a toggle switch, a blue LED, a 1K resistor, and a 9 volt battery. The switch just turns the LED on, that is all.

The concept is that the lit LED indicates a possible unsafe condition. When I begin operating, I turn the LED on and place the device at the exit of the train area. When finished operating, I see it on my way out; and the rule is that I cannot turn if off until all locomotives are secured - in other words, all panel switches set to neutral so any locomotives on the layout are disconnected from the power packs.

This ensures that on power-up next time, there will be no runaway trains.

(This is conventional cab control, using DPST switches controlling each block). 


Saturday, January 18, 2020

Easy pipe load for Tyco flats

You've seen the Tyco 40' flat car with its three giant pipe sections. They are wayyyyy too large to be believed, and they tend to roll off anyway.

photo: eBay seller nikiship

Here is how to make a more believable - and stable - removable pipe load for this car. It will rest just inside the molded tray.

1. Trim off the vertical divider tabs in 4 places. A utility knife will slice them off. Don't worry about neatness, those spots will be covered by the new load.

2. Obtain some 1/4" ID PEX plumbing tubing from your home improvement store. It comes 5 foot lengths, in grey or white. Grey is preferable, but white can be painted. A 5 foot piece is enough to make loads for two cars.

3. Cut the PEX tubing to length: 5 pieces @ 4 1/2". This is a somewhat soft plastic, you can cut it with a utility knife and cutting board. Score the tubing all the way around and gradually work the knife through it. 

4. If there is printed lettering on the tubing, rub it off using 91% isopropyl alcohol. 

5. Set up the bottom layer - three pieces tightly side by side, and run a bead of hot melt glue along the two joints. After it hardens, run two more beads, and stick the remaining two pipes on top.

6. Now the pipe load is stacked. Trim off any hot glue that oozed out. Paint if needed. I used a stick and masking tape for a painting handle to paint my white tubing grey.


7. Apply banding. I used 1/8" automotive pinstripe tape.


Now you have a nice removable load! 


Saturday, December 21, 2019

Dome car improvements


Here is a Life-Like passenger car, originally Amtrak Silver Inn 8053, after a rebuild for the Cape Ann. The detail molded into the dining area in the dome is quite amazing, but generally goes unnoticed since the entire interior is all molded grey plastic. 


Step 1 (interior): A careful repaint in contrasting colors shows that each table has four place settings, silverware, coffee cups, napkins, and salt and pepper shakers! Here the carpet has been painted yellow, chairs Cape Ann green, tablecloths maroon. 

Step 2 (not shown): Hungry passengers are brought in. It does require leg amputations to fit them into the seats.


Step 3 (exterior): The all-clear dome needs a bit of work. First, all the window frames are painted by running a silver Sharpie pen along them for a metallic look. The a roof panel is added, made from - what else? duct tape.

Wednesday, December 4, 2019

Recycling hood unit shells

Have an old shell from a hood unit loco hanging around? You can cut it up and add some ends from styrene to make a lineside instrument enclosure, or even tool storage for your shops. It would be a shame to let those nice doors go to waste!


Friday, November 22, 2019

Staging a loco service in the shop

What to do with a dummy locomotive - or a beyond-repair locomotive? It can be staged as a unit being serviced. Here is an AHM dummy Alco "1000" (I think it is really a model S3). It is parked on the service track at Bolton Shops.


Some of the access doors have apparently been removed for expediency. In reality, the doors are still in place, but have been painted flat black to make them just appear as openings. Four new "doors" have been cut from styrene and painted to match, and leaned against the hood. A workman is posed in position, along with his tool box. And the blue flag lanterns (LEDs) have been set in place foreward and aft.

A similar trick has been used to open some car hoods. See this post.


Tuesday, November 19, 2019

Pimp my Pancake Motors

The Cape Ann is a point-to-point layout with no provision for turning trains or locomotives. There is a runaround track at each end which allows locos to run around the train. With this configuration, it makes sense for the usual power to be two locos running back-to-back, so they need not be turned.


paired F7's

The standard loco used for passenger service is a Bachmann F9 Pancake Motor model, so called due to its "pancake" motor, having a flat 3-pole round rotor. I have standardized on this model, due to its common availability (can be had for $10-$12 used on eBay), and ease of service. This is a trainset quality loco, but with some tweaking we make reliable runners out of them. The pancake motor itself is never the issue, it is a nice little motor. The problem with it is getting the power to it reliably. (Some Like-Like locos use the same motor). 

The plan is to run the locos in mated pairs. First we will make each loco operate reliably independently, then wire them together. This results in a two-motor loco with double the number of electrical pickup axles. This arrangement makes it immune to any dropouts of power, since the pickup axles are now spread over a greater distance. Now it is a strong puller and will not stall over turnouts.

typical pancake motor loco

1. Find appropriate locos. We search eBay for "HO Bachmann F9" or "HO Santa Fe 307" for possibilities. Look at photos closely. You can generally identify a pancake motor model by the odd notch in the fuel tank area - see pencil point in photo. Every one we have seen with this notch has been a pancake motor.

notch here generally indicates a pancake motor model

Electrical tuneup: Remove the sideframe housing from the pickup truck. Remove the wheelsets for cleaning. Clean the treads and the back sides of the wheels as well (I use a little wire brush in a Dremel tool). Brighten up the wiper strips as well. Place a tiny dot of oil at the four points at which the axles rotate within the sideframe (this should cure any locos which require a little push to start). 

Drivetrain tuneup: Remove the sideframe housing from the drive truck. Place one dot of oil on each gear. Install new traction tires. I like the ones from eBay seller "ggnlars".

Lighting upgrade: Remove the stock lamp and replace with a 12v LED (All Electronics PN LED-12W) and a 1K resistor (All Electronics PN 291-1K) in series. Be sure polarity is correct - it will only light in one direction of travel. This will provide directional, constant-intensity lighting. The LED will be at full brilliance before the loco has enough voltage to begin moving.

Weight check: I add weight to 12 ounces - but that is a personal preference. 

Test each loco independently. Make sure it starts without nudging, and runs smoothly. If it requires a "nudge" to start, that indicates friction somewhere. See the note in Electrical Tuneup about lubing the axles. 

Once they are operating 100%, wire the locos together. I run paired #24 speaker wire between the locos, passing it through the rear window of each unit. 


click to enlarge

After shells are replaced, form the wire into a U-shape to allow flexibility.


I leave the stock horn-hook couplers as is to join the locos. 

Where else can get you a dual-motor loco for the price?