
Friday, December 29, 2017
LEGO block HVAC units
These rooftop HVAC units are mat board pieces glued around LEGO blocks. The blocks are upside down, so their nubs form feet for them to stand up off the roof a bit. The other vent units seen are caps from computer cables, and some keycaps from a dead laptop kepboard.

Easy LEGO block sheds
This article describes how to make sheds and small utility buildings using a core of Lego blocks.

Parts required:


Parts required:
- Legos, 2x2 used here (has 4 nubs).
- Mat board scraps from a framing shop
- Hot glue gun
- Black cloth tape (friction tape or gaffer's tape)
- Acrylic paints in desired colors

Sides are hot-glued onto the Lego core, then additional pieces added behind the window openings. Black "panes" are inked in. Doors are glued on the outside. Glue on the roof and apply black cloth tape for texture.

Stack some more Legos and snap into the bottom to make a temporary painting handle.

Grey acrylic paint is applied unevenly to the roof to simulate weathering.

On larger buildings, use Legos to keep the corners square and to provide a gluing surface.

Thursday, December 28, 2017
What to do with brass track?
Everyone has some old brass track around, and it is just plain awful to use. Brass oxidizes, and the oxidation is non-conductive, so you have to continually clean it to get power to your locos. Nickel-silver track oxidizes, too; but the oxidation is conductive - so you don't have to do anything to it!
But what to do with the old brass stuff? Here's a way to use up your brass track. This line with the hoppers on it is brass - and it is a fake line, it just runs between two fake tunnel portals on the layout. It doesn't connect to anything, and it is not powered. My backstory is that is was abandoned when the tunnels were bypassed by that nice nickel-silver line in the foreground. I just stash my seldom-used MoW cars on it.

But what to do with the old brass stuff? Here's a way to use up your brass track. This line with the hoppers on it is brass - and it is a fake line, it just runs between two fake tunnel portals on the layout. It doesn't connect to anything, and it is not powered. My backstory is that is was abandoned when the tunnels were bypassed by that nice nickel-silver line in the foreground. I just stash my seldom-used MoW cars on it.

Monday, December 18, 2017
MEC interchange and caboose
The daily Maine Central /BAR interchange run usually shows up with a nice Tyco caboose bringing up the markers. This is an oldie, from my original train set when I was kid (at that time it was silver and said Southern Pacific); so I put it about 50 years old. So far.


Mini Diner 901
The work crew thought they had died and gone to heaven when this showed up on the work train. This is 901, a shorty diner in a grey/black paint scheme reminiscent of the 20th Century Limited. The Cape Ann needed to replace the worn-out “kitchen car” - a converted boxcar which featured take-out dining (no seating), and came up with this instead. This carries a 900-series road number which indicates non-revenue service, so it won’t appear on regular passenger trains. It will be shared between the MoW work trains and the business train.

Sunday, December 17, 2017
Switcher 200 + Slug 701
Cape Ann 200, an EMD SW-1, is the yard switcher assigned to Davis Yard. Here it seen entering the yard from the intermodal terminal, pulling a sting of shipping containers. It used to struggle with long cuts of cars until it got mated to switching slug 701.

200 is an AHM, slug 701 was made by splicing and shortening two AHM GP-18’s (like 714 in the foreground).

200 is an AHM, slug 701 was made by splicing and shortening two AHM GP-18’s (like 714 in the foreground).

Switcher 273, an Alco 1000
Cape Ann 273, an Alco 1000, is seen parked outside the Bolton Shops. It was picked up at auction, non-operational, and was towed to the shop for a spare-time project for the shop crew. They work on it as time permits. Once operational, the plan is to use it as a switcher for the shops, so it is unlikely it will ever get painted in Cape Ann colors. Right now the crew is busy with a UP boxcar that is getting a door repair.


Saturday, December 9, 2017
CP's exploding boxcar
CP 34053 has appeared on the interchange track - and it is a car with a story attached.

There is no car storage on my layout. Every car on the layout is in the process of going somewhere else. Storage is in a rolling wire rack, which represents the world beyond the layout. Cars are selected from the rack by a roll of the dice and come in to the layout on one of the two interchange tracks.
Sometimes the roll of the dice turns up a car with memories. CP 34053 turned up last night. This is a HO scale Lionel exploding boxcar from when I was a kid, probably about 50 years old. It has a mousetrap-like mechanism inside which would explode the boxcar periodically causing great hilarity. (Here also is a pic of a similar car from eBay seller bggameboy showing what is inside).

In the years between childhood and getting married (and a basement) I amused myself by making structures and cars for the future layout. At some point I disabled the mechanism inside this car, glued it shut, and repainted for CP Rail.
There are a number of cars from my original train set still in revenue service on the layout.
Tyco CP Rail boxcar reworked
A heavily reworked Tyco CP Rail boxcar shows up on the empty track at Kenton Yard. The multimark logo has been corrected (colors were reversed) and moved to the end of the car. The road number and reporting marks have been rearranged (would have been obscured by an open door). These issues were caused by Tyco opting to center a print pad intended for a 40’ car on a 50’ car, rather than make a new one.


Before

After
Tuesday, December 5, 2017
$1 Lumber truck
Saw a cute "glass truck" at Dollar General - Matchbox brand - for $1. A little disassembly, a new deck made of styrene, and the lumber yard has a new delivery truck.


Out of the box truck.

Drill out 2 rivets to separate the parts. The blue piece was cut in half, keeping the cab half and discarding the "glass panes". The rack was discarded.

Stripped down truck. A U-shaped deck was cut from styrene and glued in place around the center spine.

The lumber load is stacked over the center spine to conceal it.
Monday, December 4, 2017
Night shot with Sepia
This pic was an experiment. I wanted to create a more dramatic night shot, so was going to try converting my color pic to black and white. However, the simple editing software I was using did not offer that as an option, but it did offer "sepia". I think it came out pretty well!


Thursday, November 30, 2017
Pizza Box Track Planning
This article describes a classic method of track planning, which allows you go from an idea directly to laying track - bypassing the scale drawing stage entirely. This is the method I used on my layout. It still works fine, and plus you get a pizza (or two) to eat!
PREPARATION
This assumes you have your benchwork ready.
Having a rough sketch is helpful to begin, but is not required. You can design on the fly as you go along.
You will need one turnout of each size you plan to use (#4, #6, etc). Either left-hand or right-hand is fine. If you don't have turnouts in hand, many manufacturers offer actual-size image downloads from their web site.
Place a turnout in a photocopier and make a bunch of copies of it. If you only have a left or right, flip it over and copy the other side to make the mirror image turnouts. Cut out the images.The only critical part here is to cut exactly on the track ends.
Obtain a large pizza. Eat (or discard) the pizza, and save the box lid. (Any large flat piece of cardboard may be substituted). This will become your template.
Make the template by drawing a quarter-circle on the cardboard of your desired minimum radius curve. Track radii are measured to the track centerline. For HO, subtract 1/2" since we will measuring to the inside of the track. See figure 1.

If you want a 24" curve, make the cardboard's radius 23.5". For my HO layout, I used two: a 20" radius for industrial trackage, and 24" for everything else. Cut out the templates.
EXPERIMENTATION
Now we begin. Place the turnout copies on the layout, approximately where desired. Try "connecting" them using flex track. When you have a curve, use the cardboard template as a feeler gauge on the inside of the curve. If the track encroaches on the cardboard, your curve is too tight. Adjust location of your turnouts so any curves fall outside your templates.
EASEMENTS
Easements are used to gradually enter a curve, both on the prototype and models. Easements improves reliability and avoid the tinplate-train-suddenly-lurching-into-a-curve effect.
For a full discussion of creating easements, refer to the NMRA Data Sheet . It's pretty complex, so here is a quick-and-dirty method of creating a certain radius curve with easements:
Extend the lines of the two tangent (straight) tracks on either side of your proposed curve, until the lines cross. See Figure 2.

Place the template inside the intersection, but space it out a bit (offset) from each line. An offset between 1" and 2" works well for HO.
Place the flextrack tight to the center portion of the template, and allow the ends to join the straight track naturally. A flexible yardstick on edge can also be used. See Figure 3.

Then lay your track on the line. A thin bead of latex caulking can be used to glue it down, and still allow it to be removed in the future. You may wish to tint the caulking an earth tone color prior to applying to avoid it showing between the ties.
Draw a pencil line along your desired track line.
TRACK LAYING
To make an adhesive that is flexible and repositionable, use white latex caulk. Squirt some into a container. Tint it by adding earth tone acrylic paint (so it won't be obvious if it shows between the ties) and mix. Apply sparingly to the track centerline using a putty knife. Press turnouts in place, and connect using flex track along the lines drawn earlier. Curved track may need some track nails or pins to keep it from springing back. You will be able to reposition track as needed for a few hours before the caulk dries.
Once you are happy with it, secure with some track nails.
Removal, if needed, can be done by prying a putty knife under the track and popping it off the caulking.
If you need assistance disposing of additional pizza, give me a call.
Sunday, November 26, 2017
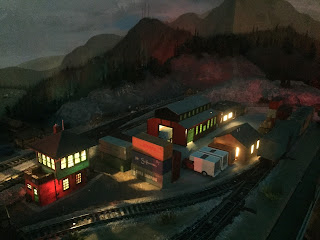
Night scenes
A couple of night scenes now that Kenton is fully lit up. All that remains are the streetlights, they will go in soon. Lighting the towns makes night operations a lot more fun.


LED Structure Lighting
1 December is a great time to light up the structures on your layout. LED Christmas lights are available everywhere. This box of 100 was about $4 and contains 100 3mm LEDs.

2 Each LED housing is held in with a retaining clip (arrow). Flip the clip open and pull the entire LED/housing free. Solder wires to the LED. On these, the LED lead next to the retainer clip is the (+) lead. Add a resistor appropriate for your voltage. I use a 5 volt supply, and 330 ohms works well.

3 Drill a 1/4” hole in the layout and poke the wires down until the LED housing is flush. To avoid seeing a point-source LED through the structure windows, make a diffuser from a strip of plastic cut from a milk bottle.

4 Diffuser set in place

5 Testing the LED

6 Set your structure on top.

Thursday, November 23, 2017
Generic box trucks
Dollar General carries some Matchbox cars (for $1 even!) and their selection usually includes some box trucks. Here is one with the stock Chinese (?) writing on it. Masking and spray painting white makes a nice generic box truck, seen here. Also note the HO scale light blue truck backing into the N scale enginehouse in the background!


Wednesday, November 22, 2017
A nice $65 drill setup
Here is a “home-made” model drill set which I put together following a clinic at our local NMRA meeting (Thanks, Rich Breton!). I’m glad I did, it has made the task of drilling small holes simple.
This is a battery-operated General Tools model 500 screwdriver. It uses 2 AA batteries. A drill chuck from Micro-Mark fits right in. It turns very slowly, so slow you can see the fluting on the drill bit turning; perfect for drilling plastics. The control reverses the direction of turn, the speed is fixed.
About $65 set me up with everything.
Micro-Mark 82727: 20pc drill bit set, #41-#60 $19.99
Micro-Mark 26104: 20pc drill bit set, #61-#80 $10.99
Micro-Mark 86259: Drill chuck $16.99
General 500 Precision Cordless Screwdriver, about $19 at Lowes or Amazon
Also note NMRA members get a discount from Micro-Mark.

Wednesday, November 15, 2017
Before you do the 4x8 thing...
The traditional starter railroad is on a 4x8 sheet of plywood. However, a rectangle has limitations - it is difficult to use the corner space in a practical way. Here's an easy improvement on the good old 4x8. Cut two triangles, A, and B, off one end. Flip them around and attach to the other end. Now your 4x8 is 4x10, with a shape better suited to a big oval, with a longer mainline run. Formerly wasted corner space is gone.


Switchlist for the Kenton Turn
Well, I have tried a switchlist and I am sold on it. The Kenton Turn departs Davis Yard as Train 61, works only the trailing point industries all the way to Kenton. The loco runs around the train, and becomes Train 62 heading back to Davis Yard, switching the remaining industries (now trailing point) on the way.
It was always confusing keeping the setouts/pickups straight but this does the trick now.

Saturday, November 11, 2017
Easy domed rooftop vents
A little find from Hobby Lobby - 1/4" furniture buttons, intended to fill in screw holes - 32 for $1.99. They make nice little HO scale domed rooftop vents. Item 621367. I just stuck them on some tape and colored them with a silver Sharpie pen.


Friday, November 10, 2017
Wrong color, but expedient
CR 260517 wound up on the shop RIP track with a damaged door. All they had handy for a replacement was one still in PC Jade Green.
The speckly rust effect was made by making a distant squirt from a spray can of red auto primer.

Sunday, November 5, 2017

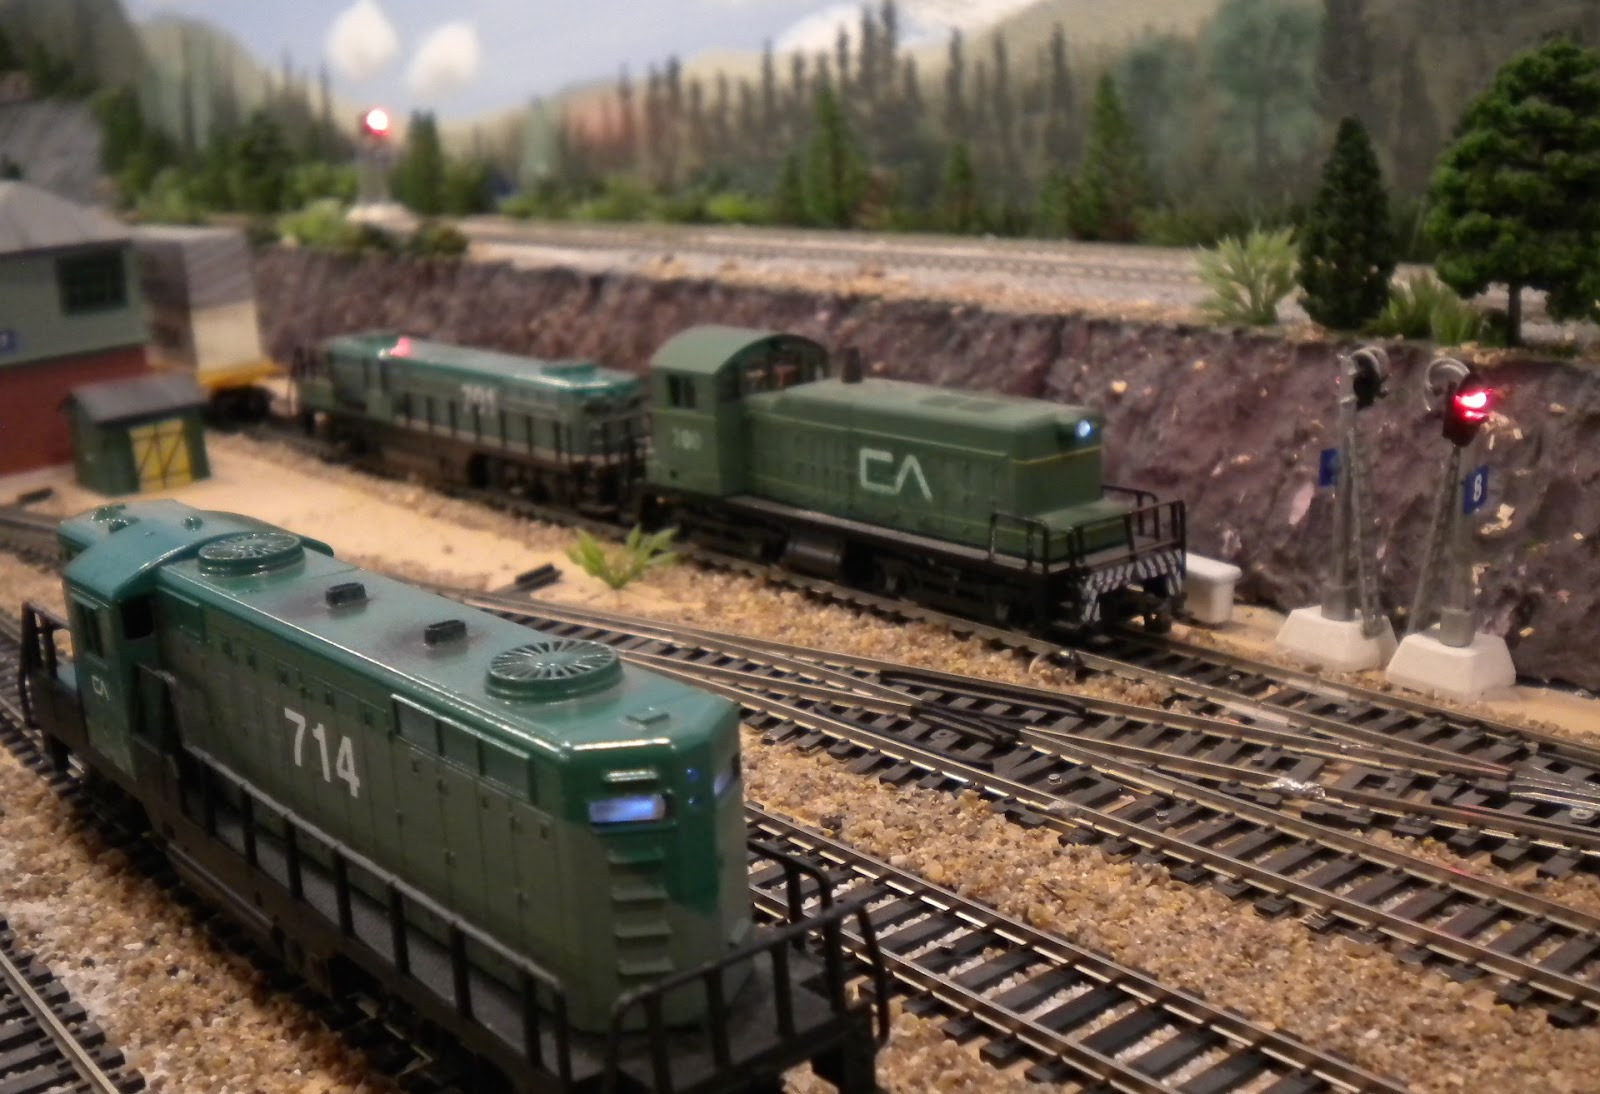
Four new GP-18s in service
Four "new" (to me) AHM GP-18's, 604, 608, 714, and 790 are just out of the shops and ready to be placed into service. All are eBay finds. The AHM GP-18 is the mainstay of Cape Ann's freight service. They are readily available (around $20 for a running one), and very easy to completely disassemble for cleaning and service. 8 wheel electrical pickup, 8 wheel drive. They get a complete overhaul here: clean, lube, directional LED headlights, paint, and decals.


Saturday, October 21, 2017
Visiting the Cemetery
What to do with that narrow vacant 2" strip along the front edge of the layout? I just buried 69 people (mostly nitpickers) in it. Plots are still available, keep that in mind. Now to mow the grass.


Gravestones are bits of styrene painted various shades of grey, pointed on one end for poking into the Styrofoam base. Crosses are cut out of plastic canvas material.
Sunday, October 15, 2017
Shallow background buildings
A block of five background buildings have been planted on the layout. The five shallow buildings along the back are one assembly. They are made from cut up cell phone boxes, faced with mat board, windows made from fiberglass mesh drywall joint tape to give the appearance of individual panes. Lights are LEDs removed from a Christmas tree light string. A 5volt bus runs between the buildings to distribute power for the LEDs.


Tuesday, October 3, 2017
Staging move for Rotary 902
Every October, Cape Ann Rotary 902 is pushed up the 3% grade thru Cascade and on to Pamola siding to be staged there for attacking the drifts that are sure to come. Already there are some flurries in the higher elevations.


Snow flurries at Cascade Pass
It is only October but already snow flurries are in the air as Cape Ann's Acadian crests Cascade Pass at the start of the long downgrade to Sanford, Maine.


Cars are Tyco, rebuilt with constant intensity LED lighting.
Photos: 2D and 3D
Why do photos of a layout look more realistic than actually viewing the layout? When viewing a layout, the eye is seeing a combination of 3D objects (the models) and 2D objects (a flat painted backdrop, for example). The eye cannot be fooled. The eye sees actual 3D objects in front of a flat background. When you take a photo, the entire scene is converted to 2D, as photos have no depth. Now the playing field is levelled - the flat background has just as much to contribute as the actual models. This is widely used in movies when actors are placed in front of matte background paintings - looks fake in real life, but once on film it is quite convincing. In 1942, when Casablanca was filmed, aircraft were in short supply due to the war - so the final airport scene was filmed in front of plywood cutouts of airplanes. And you can't tell!
It is always surprising what shows up in photos. Photos can be a great modeling tool - by taking a photo on your layout, and then examining it to see what "gives it away" that it is a model and not the real thing, showing you what aspects of your modeling could be improved a bit.
Case in point: I thought this pic of Cape Ann covered hopper 7484 was pretty convincing - until that shiny nickel-silver rail jumped out at me! A brush and some brown paint on the rail web corrected it. Compare before and after.


Sunday, September 3, 2017
Using Tyco 40' flats with containers - Part 4 video
All done! Here are the five cars on their maiden run on the layout!
Saturday, September 2, 2017

Using Tyco 40' flats with containers - part 2
Containers, cut to 34', ride nicely in the molded tray on the modified Tyco 40' flat.


Friday, September 1, 2017
Using Tyco 40' flats with containers - part 1
Progress on trying 40’ Tyco flats for container service. The pipe retainer tabs have been ground flat with a Dremel tool. The car has been painted Trailer Train (TTX) yellow (Rustoleum Painter's Touch Golden Sunset gloss spray paint), then masked black for numbering. 1x1 SFS (Sanded Four Sides) molding (sold by the foot at Home Depot) has been cut to 34' to fit inside the tray. Next will be turning the wood molding into a container.


Subscribe to:
Posts (Atom)