Sunday, November 25, 2018

Horizontal scratches

Freight cars get lots of horizontal scratches...

Photo by Stan Lytle, posted on RailcarPhotos.com

But it can be difficult to make them level. Here is a way to make nice level scratches.

I use disposable lip liner cosmetic brushes ( link ).


I mount one in a portable drill press vise to hold it secure, apply a bit of rust paint to it, then just roll the car past it.


I use acrylic craft paint, so if something goes wrong, it comes right off with a damp Q-tip.

Thursday, November 22, 2018

Car cards and waybills

I use car cards and waybills for freight car routing. Here is a simple method that requires no paperwork once it is set up.

There is one car card (the yellow card shown here) for each freight car. It is cut to baseball-card size so it will fit in a standard baseball card sleeve. The waybill is the white piece. It identifies where the car is going by a three-letter abbreviation, here GCF for Glen Cove Fuels. The train drops the car at Glen Cove Fuels, and the car card then rests in a channel on the front of the fascia. (The channel is vinyl molding made for bathroom tile).


After the operating session, the waybills are "turned" for the next routing. The waybill is just pulled out of the sleeve and tucked behind the car card. The car is now empty.


The destination for the empty is now revealed - in this case S for South Interchange. It will leave the layout via the South Interchange, and get removed and placed on the storage rack for future use.

Hair elastics

Here is a way to keep car cards together with rolling stock when off-layout: hair elastics! 


I had used rubber bands, but they are inconsistent sizes and were always breaking on me. These hair elastics are all the same size, soft and stretchy, and economical.


Sunday, November 18, 2018

UPS truck

Found in Walmart - Hot Wheels "Combat Medic" van in all its garish glory. It is available in many different color schemes, all of them just as awful. Orange windows?!?!? The shape looks about right for a UPS truck though...
Hot Wheels "Combat Medic"


Here is a real one.


After drilling out the two rivets, this is what you get. Body has been brush painted brown. The chassis was spray painted black just to get the wheels colored, then trim rings highlighted with a silver Sharpie pen. Window glass was painted flay grey.


Painting the orange window insert grey makes a more believable effect. Clearance lights are dotted on with a mini-brush.


All done... those are true HO scale figures, so as far as size goes, I say it passes the good-enough test. Lights were dotted on with a mini-brush. Stripe was leftover from a decal set, logo brush painted on. This can also be modeled with the door open if desired, it can be easily removed from the inner piece.


Wednesday, November 14, 2018

Easy 55 gallon drums

I was in Home Depot looking at electrical connectors when I saw these (intended for crimping bare ground wires together), and my 'scale eye' saw HO scale 55 gallon oil drums! 100 for about $8. (They also sell them in 10-packs for under $2). They have a little flange on one end, which makes a nice base so it will sit flat. You can also get them from Amazon. You can make either open or closed drums.


1. Copper Crimp Sleeves, 18-10ga.

2. Paint the inside brown. A Q-tip is perfect as a brush, just insert and turn it around.

3. A pencil makes a good painting handle. Insert it with the flange toward the pencil point, so you can just tip it off the pencil after painting.

4. Paint it up.  Craft store acrylic paint goes on nicely and dries to a flat finish. An initial white coat followed by color top and bottom bands will give the impression of a ridged drum. Here I am using a "lip liner" disposable cosmetics brush (source).

5. Touch the top rim with the brown Q-tip to cover any shiny copper remaining on the edge.


6. Drums in place on the loading dock. 

Now I had some open drums. I wanted to make some closed drums. I tried several things, but best results were with auto body spot putty. Goop some in and let it harden. It may need some light sanding. It settles and shrinks slightly as it dries, creating a nice "rim" around the top. 

The final product, seen here in between some (LED Christmas light) gas cylinders and (sewing bobbin) cable spools.


At 100 drums for $8, you can create your own hazardous waste site in no time!


Monday, October 15, 2018

Tonka Tinys: N scale vehicle roulette

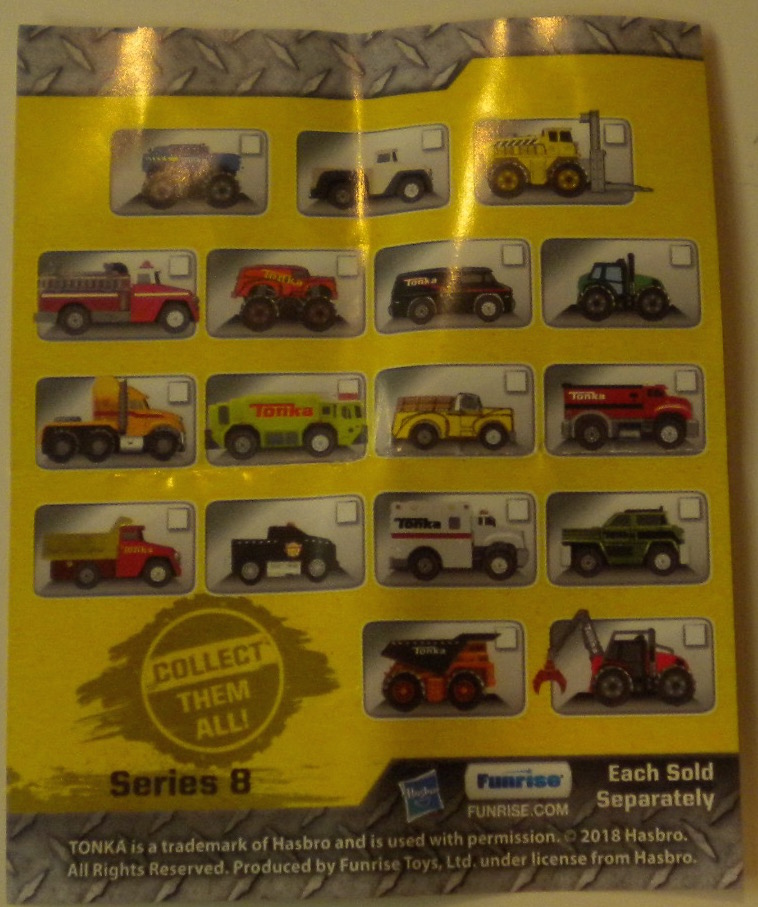
N scalers: Want to try a $1.99 gamble? I came across these at Target. They are "Tonka Tiny's" sold blind (you cannot see what's inside until you buy it) for $1.99. There are various trucks and construction vehicles. They come in a stackable plastic "garage" which can probably find a home on your layout also.


I bought one to check it out. I got a little pickup truck which measures 18 feet on my N scale rule, which is right on the money.

18 feet long - perfect for N scale

The little insert inside the box shows the various vehicles available. If your significant other is hinting for Christmas stocking suggestions, this could be the ticket. Could maybe use for distant scenes in HO too.

insert (click pic to enlarge)

Sunday, October 14, 2018

Wood chip hoppers

Railroads extend the height of standard hopper cars to carry a full load of low-density wood chips. A recent loco buy on eBay came with some 40' hoppers and 40' gondolas, so this project will combine them to make some wood chip hoppers.

Gondola + hopper = wood chip hopper!

1. Mix and Match: First remove the trucks and couplers and set them aside. The gondolas were test-fit on the hoppers and lined up well. They required three easy modifications:
  • Remove the gondola's brake wheel (we don't need two, we will rely on the lower one on the hopper)
  • Remove the gondola's four corner stirrup steps
  • Remove the gondola's weight (we don't want weight high up in the car)
2. Adjust Weight: All the individual parts for each car were weighed in a batch. Be sure to include the trucks. The target weight (per NMRA recommendation) is 4 ounces. They were both too light, so weight was added to the floor of the hopper. (The interior of the hopper will not be seen, as the gondola floor will cover it).

3. Glue up: The gondolas were glued to the hoppers. I needed a glue which was rather viscous and gap-filling so I mixed some 5 minute epoxy (the type that comes in a double syringe) and brushed that on. Weights were placed on top and left overnight. This worked perfectly - and permanently. "What epoxy hath joined together, let no man put asunder."


Lantern battery and old flatiron serve as gluing weights.

4. Primer: The cars were taken outside to my "spray booth" which is a stepladder inside my woodshed. Cars were sprayed with grey primer from a rattle can. My holder is made from scraps of 1x4.


Primer is applied

5. Rust the interior: Masking tape is applied and the interior of the gondola is sprayed with red auto primer - which is my universal rust color.


Interior painted with red auto primer

By now you probably realize when we get to adding the wood chip load, we need not fill the hopper at all! (We can't anyway, it is no longer accessible). We will only be adding a thin layer of chips to the gondola. The viewer will never realize there is now a false floor in place.

Interior after painting

6. Exterior paint: Next we mask off the interior and paint the exterior. These are going to be Maine Central cars so a deep green is sprayed on.

7. Decals: I had some leftover MEC decals so they are used rather than buying new ones.


8. Wood chip load: And now ... the perfect load - cedar cat litter. They are real, but tiny, wood chips. No one can say "it ain't protoype!"

9. Secure the load: The chips are wet with sprayed 71% isopropyl alcohol, then glued in place with 50/50 white glue/water.

10. Finishing touches: Replace the trucks and couplers. Weather as desired.